
In the following the steps are shown how to create a simple web service with the Spring Web Service Framework using a JAXB2 marshalling. The example web service produces a list of random numbers. The amount of random numbers generated is specified in the request.
Prerequisites:
- Eclipse Helios (3.6)
- Installed m2eclipse plugin – this is not absolutely necessary, if you don’t want to use it, you can perform the Maven steps on the command line
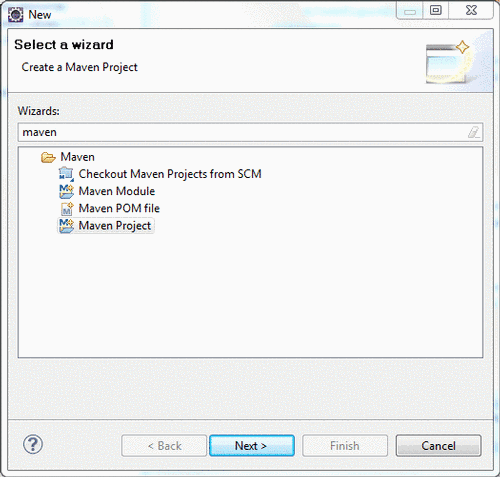
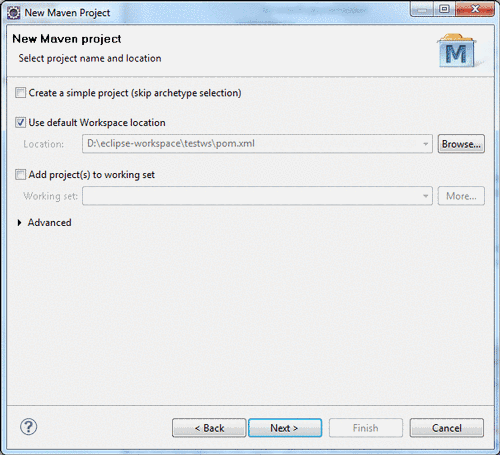
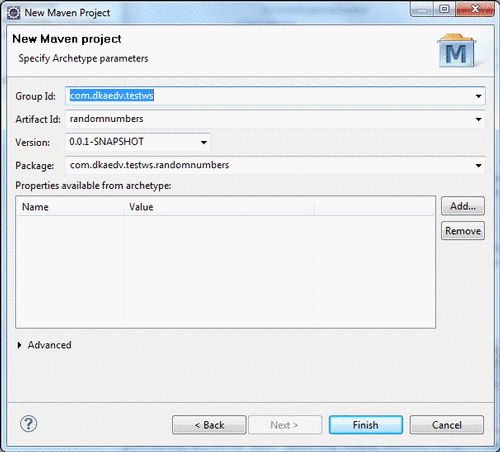
First, we create a Maven project using the Spring WS archetype.

Next, we change the dependency versions in the generated POM file to the current stable version (1.5.9) of Spring WS. Additionally we’re using Java version 1.5 and add the Jetty plugin for testing the service later.
<?xml version="1.0" encoding="UTF-8"?>
<project xmlns="http://maven.apache.org/POM/4.0.0" xmlns:xsi="http://www.w3.org/2001/XMLSchema-instance"
 xsi:schemaLocation="http://maven.apache.org/POM/4.0.0 http://maven.apache.org/maven-v4_0_0.xsd">
  <modelVersion>4.0.0</modelVersion>
  <groupId>com.dkaedv.testws</groupId>
  <artifactId>randomnumbers</artifactId>
  <packaging>war</packaging>
  <version>0.0.1-SNAPSHOT</version>
  <name>randomnumbers Spring-WS Application</name>
  <url>http://www.springframework.org/spring-ws</url>
  <build>
    <finalName>randomnumbers</finalName>
    <plugins>
      <plugin>
        <inherited>true</inherited>
        <groupId>org.apache.maven.plugins</groupId>
        <artifactId>maven-compiler-plugin</artifactId>
        <configuration>
          <source>1.5</source>
          <target>1.5</target>
        </configuration>
      </plugin>
      <plugin>
        <groupId>org.mortbay.jetty</groupId>
        <artifactId>maven-jetty-plugin</artifactId>
        <version>6.1.10</version>
      </plugin>
    </plugins>
  </build>
  <dependencies>
    <dependency>
      <groupId>org.springframework.ws</groupId>
      <artifactId>spring-oxm-tiger</artifactId>
      <version>1.5.9</version>
    </dependency>
    <dependency>
      <groupId>org.springframework.ws</groupId>
      <artifactId>spring-ws-core-tiger</artifactId>
      <version>1.5.9</version>
    </dependency>
  </dependencies>
</project>
To let Eclipse know about the changes in the POM, we update the project configuration by right-clicking on the project -> Maven -> Update Project Configuration.
Next, we need to create an XML Schema for our service. Therefore we create a folder „xsd“ within src/main/webapp/WEB-INF and create the following „randomnumbers.xsd“ in there. The data structure itself is very simple. It contains two elements, the RandomNumbersRequest with the amount parameter and the RandomNumbersResponse containing a list of numbers.
Note, that the element names conform to the Spring naming conventions, i.e. the suffixes „Request“ and „Response“.
<?xml version="1.0" encoding="UTF-8"?>
<schema xmlns="http://www.w3.org/2001/XMLSchema" targetNamespace="http://www.dka-edv.com/RandomNumbers"
 xmlns:tns="http://www.dka-edv.com/RandomNumbers" elementFormDefault="qualified">

 <element name="RandomNumbersRequest">
    <complexType>
      <sequence>
        <element name="amount" type="int" />
      </sequence>
    </complexType>
  </element>

  <element name="RandomNumbersResponse">
    <complexType>
      <sequence>
        <element name="number" type="int" minOccurs="1" maxOccurs="unbounded"/>
      </sequence>
    </complexType>
  </element>
</schema>
From this XSD the interface classes for the request and response can be generated. These classes will be used by the JAXB2 marshaller to convert the web service requests and responses from/to XML. The code generation is configured by adding the appropriate build plugin in pom.xml:
<plugin>
  <groupId>org.codehaus.mojo</groupId>
  <artifactId>jaxb2-maven-plugin</artifactId>
  <version>1.3</version>
  <executions>
    <execution>
      <goals>
        <goal>xjc</goal>
      </goals>
    </execution>
  </executions>
  <configuration>
    <packageName>com.dkaedv.testws.randomnumbers</packageName>
    <schemaDirectory>src/main/webapp/WEB-INF/xsd/</schemaDirectory>
    <schemaFiles>randomnumbers.xsd</schemaFiles>
    <outputDirectory>${basedir}/src/generated/java</outputDirectory>
  </configuration>
</plugin>
To actually generate code, run the generate-source target. This can be done in Eclipse by running the project as Maven build or on the command line:
mvn generate-sources
Afterwards, create the folder src/main/java to be able to implement the actual web service endpoint. Afterwards, refresh the project in Eclipse and update the Maven project configuration as before (Right-click the Project -> Maven -> Update Project Configuration).
Next, create the class RandomNumbersEndpoint as a subclass of AbstractMarshallingPayloadEndpoint that contains the implementation of the service:

package com.dkaedv.testws.randomnumbers;

import org.springframework.oxm.Marshaller;
import org.springframework.ws.server.endpoint.AbstractMarshallingPayloadEndpoint;

import com.dkaedv.testws.randomnumbers.RandomNumbersRequest;
import com.dkaedv.testws.randomnumbers.RandomNumbersResponse;

public class RandomNumbersEndpoint extends AbstractMarshallingPayloadEndpoint {

  public RandomNumbersEndpoint(Marshaller marshaller) {
    super(marshaller);
  }

  @Override
  protected Object invokeInternal(Object request) throws Exception {
    RandomNumbersRequest rnReq = (RandomNumbersRequest) request;
    RandomNumbersResponse response = new RandomNumbersResponse();

    int n = rnReq.getAmount();

    for (int i = 0; i < n; i++) {
      int randomNumber = (int) (Math.random() * 1000);
      response.getNumber().add(randomNumber);
    }

    return response;
  }
}
As the final step, we need to add the appropriate configuration to spring-ws-servlet.xml.
<?xml version="1.0" encoding="UTF-8"?>
<beans xmlns="http://www.springframework.org/schema/beans" xmlns:xsi="http://www.w3.org/2001/XMLSchema-instance"
 xsi:schemaLocation="http://www.springframework.org/schema/beans http://www.springframework.org/schema/beans/spring-beans-2.0.xsd">

  <!-- Publish the WSDL
         at http://localhost:8080/randomnumbers/randomNumbersService/randomNumbers.wsdl -->
  <bean id="randomNumbers" class="org.springframework.ws.wsdl.wsdl11.DefaultWsdl11Definition">
    <property name="schema" ref="schema" />
    <property name="portTypeName" value="RandomNumbersPT" />
    <property name="locationUri" value="http://localhost:8080/randomnumbers/randomNumbersService/" />
  </bean>

  <bean id="schema" class="org.springframework.xml.xsd.SimpleXsdSchema">
    <property name="xsd" value="/WEB-INF/xsd/randomnumbers.xsd" />
  </bean>

  <bean id="marshaller" class="org.springframework.oxm.jaxb.Jaxb2Marshaller">
    <property name="classesToBeBound">
      <list>
        <value>com.dkaedv.testws.randomnumbers.RandomNumbersRequest</value>
        <value>com.dkaedv.testws.randomnumbers.RandomNumbersResponse</value>
      </list>
    </property>
    <property name="schema" value="/WEB-INF/xsd/RandomNumbers.xsd"/>
  </bean>

  <!-- Endpoint Definiton -->
  <bean id="randomNumbersEndpoint" class="com.dkaedv.testws.randomnumbers.RandomNumbersEndpoint">
    <constructor-arg ref="marshaller" />
  </bean>

  <!-- Routing -->
  <bean class="org.springframework.ws.server.endpoint.mapping.PayloadRootQNameEndpointMapping">
    <property name="mappings">
      <props>
        <prop key="{http://www.dka-edv.com/RandomNumbers}RandomNumbersRequest">randomNumbersEndpoint</prop>
      </props>
    </property>
    <property name="interceptors">
      <bean class="org.springframework.ws.server.endpoint.interceptor.PayloadLoggingInterceptor" />
    </property>
  </bean>
</beans>
That’s it. You can run the project using the Maven target „jetty:run“, e.g. on the command line:
mvn jetty:run
The WSDL should now be accessible at the address http://localhost:8080/randomnumbers/randomNumbersService/randomNumbers.wsdl. Note, that the WSDL was generated by Spring from the XML Schema created earlier – a manual creation is not required.
Of course you can now access and test the web service by using soapUI for example.