
Finally the first Arduino TPUART interface on a nice PCB is done:
-
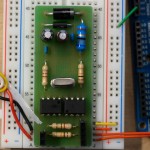
- TPUART PCB in action
-
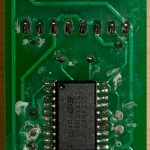
- TPUART PCB bottom
After figuring out how to solder the surface-mounted TP-UART chip the rest was really easy and the Arduino is working with EIB / KNX as before. If you want to get some PCBs made for yourself, feel free to use this layout from the repository.
Hi Daniel
your site is a great source of info for those wanting to start using KNX on arduino.
I want to implement KNXnet/IP on arduino and still have a couple of questions
1) is it necessary to implement ACK. If so how do I construct a ACK message?
2) can you give me an example of some KNX messages that include multiple bytes e.g. EIS 14?
My end goal is to use arduino mega (or seduino) to connect to my hardware (12V pushbuttons connecting to stepping relay board) to e.g. openremote, using KNXnet/IP. For this I would need to implement either a custom protocol or stick to the KNXnet/IP.
I would appriciate all help or pointers towards information.
greetings
Pieter (Leuven, Belgium)
Hi Pieter,
I’m not sure if the ACK is absolutely neccessary, however all telegrams will be re-transmitted 2 times if you don’t implement it and the sending device will think that the telegram has been lost on the way. I’m not sure how different devices react in this case.
You can see my KNXTelegram class on Bitbucket to see how a 2-byte value can be inserted in a telegram (it’s in the function „set2ByteFloatValue“). Here’s the link: https://bitbucket.org/dka/arduino-tpuart/src/ce1ce29b211dbeb5d714eeb8ae0686aa51ca86ab/KnxTpUart/KnxTelegram.cpp?at=default#cl-267
Cheers
Daniel
Hello Daniel,
as Pieter above said – it is great piece of work for for us interested in KNX on Arduino… Thank you! 🙂
Could you please give me an advice where did you buy that Siemens TP-UART chip? I have tried Optermus, but they don’t deliver to private persons, just companies… 🙁
Thank you and once again – great work!
Synny
Hi Synny,
sorry I don’t know any source than Opternus.
Best regards
Daniel
Hi Daniel,
never mind… I’ll find some solution. 😉
Thank you for your effort and your work once again!
Synny
Hi Synny,
I have a good tip for you.
If you want to have a great Ardudino interface without doing all the great work in build the PCB, just use the following part number 5WG1117-2AB12 from Siemens. This is the same layout as the TP-UART2 Evaluation Board from Opternus. You can also use the data sheet of the Opternus board for the connection. At least my Arduino talks pretty well over this device.
. And, guess what, the datasheet already has the name of the Siemens device in its title.
Have much fun with it.
Cheers,
Sven
Hi Sven
Thanks for the tip!
Are you using the Arduino library from the auther of this site to run on your Arduino with the 5WG1117-2AB12? What did you made with it and does it work stable?
Laurens
I read also at some other blog that someone used the same Siemens bus tranceiver module to couple his Raspberry Pi with the KNX bus. However, he didn’t use this BTM as such, but put it on a print board to be able to connect it easily with a ribbon cable to the Raspberry Pi connectors and with some extra components to have it galvanically isolated. Is the latter one (galvanic isolation) necessary? Why / why not?
Sorry, I’m not that good (yet?) at circuitry. I’m have an education in computer science, not electronics 🙂
Hello Daniel,
Can i use fze1066 instead of siemens tpuart. Is it pin compatible with siemens tpuart. Because i didnt found siemens tpuart, but i can find fze1066. If i change that will it work?
Best regards.